LIVING RAW BY GRACE
  • Home
  • 7 Day Detox Program
    • Detox Program FAQs
    • Contact Me
    • Testimonials
  • UnCookBooks
    • Lists of Recipes

#Journey2Handstand - Day 20 - Handstand Wall Holds

1/22/2016

0 Comments

 
Woohoo!  Today is the day we get inverted completely.  Yesterday we did kickups, today we kickup and HOLD our handstand.  We use the wall for support - not as a cheat, but as a building block for our handstand practice.  Even when you can stick a handstand solid, you'll still use the wall for drills and strength building/maintaining. Also - have an exit plan.  If you are afraid to fall over, place cushions down, handstand near a couch or bed...find a way to overcome those fears.
Picture
1. Start in Down dog a foot away from the wall, facing the wall.
2. Adjust your feet so that you can kick up confidently.  One leg back - this will touch the wall first, and a strong forward leg that will kick you up into the air and find the wall last.
3. You may need to kickup multiple times before both feet find the wall.
4.  Once both feet are touching the wall - point your toes up toward the ceiling, squeeze your thighs together, draw your bellybutton toward your spine, and breathe.
5.  Breathe more.  DO NOT HOLD YOUR BREATH!
6.  When you are ready to come down, attempt to come down the same way you went up..one leg at a time.  If you topple over or fall down - that's okay! Try again!  And again! 

I want to see your handstands!!!  Take photos, take videos, if you don't want to post them, text me! 
Picture
Picture
0 Comments

#Journey2Handstand - Day 19 - Handstand Wall Kickups

1/21/2016

0 Comments

 
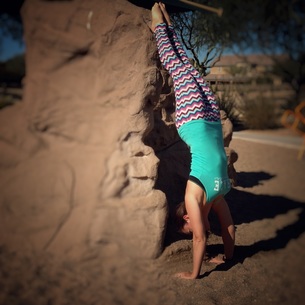
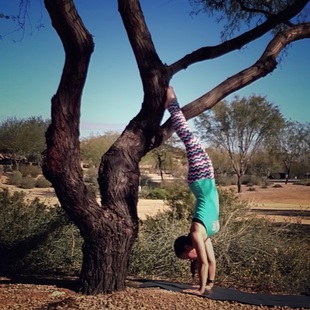
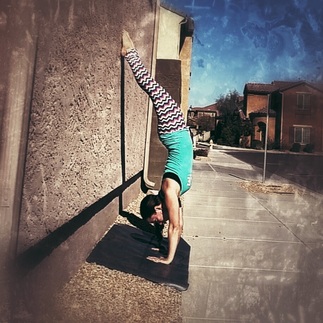
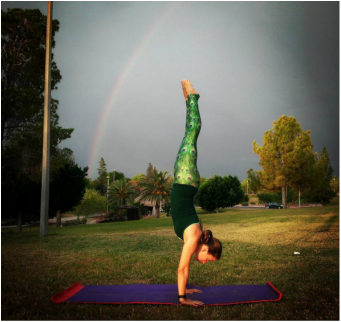
I apologize for the lateness of this post.  It's been a crazy week.  That is where grace comes in. :)  Hopefully you all have been working on the exercises that you have been given so far this month.  Today we kickup into a handstand near a wall.  We use the wall for balance, support, stability, and security. We use our muscle memory - all the exercises that we've been doing this month - to get us into a handstand.
1. Start in Down Dog a foot away from a wall, facing the wall. 
2. Take a step forward with one leg.
3. Bend the knee of your forward leg and slowly kick one foot up to the wall.  
4. Stack your shoulders over your wrists.
5. Attempt to stack your hips over your shoulders.
6. Now is not the time to stick your handstand, we are simply kicking up and coming back down.

Great!  Now let me know how it goes!  And let me know how many times you fell down - everyone does!
0 Comments

#Journey2Handstand - Day 18 - Handstand Tuck Kickups

1/18/2016

1 Comment

 
Welcome to the 3rd week of this challenge!  Today we start working specifically on Handstands!  Yay!  Today we are doing kickups.  The first thing I must specify is to practice this on a fairly soft surface (yoga mat, carpet, grass, etc.) and EXPECT to fall over.  When it comes to learning how to handstand, you need to be not only okay with falling over, crashing down, but you need to prepare for it.  The more comfortable you are with failing, the faster you will improve.  If you are hesitant, cautious, concerned, worried - that will only impede growth.  We all fall - no one is immune. 
Now that you are feeling humble and ready to fall down, let's try kickups!
1. Start in Down Dog.
​2. Send your weight into your hands, keep your back flat, bend your knees and lift your heels.
3. Take a deep inhale, and with your exhale push your toes into the mat, and slowly kick up into the air and bring your feet closer to your hands.
4. Plant your hands, push into the ground, bend your knees and slowly push up into the air - keeping your legs tucked.
5. Bring your bottom up over your hands, stack your shoulders over your hands, and then slowly come back down to the ground.
6.  Repeat as many times as you can.
7.  Slowly stand up and take a deep inhale and bring your hands overhead.  Exhale and bring your hands back down.

Wonderful.  Now do that three times today! Let me know how it goes, take a video, a photo, or just describe your journey with me! :)

1 Comment

#Journey2Handstand - Day 12 - High Plank 2 Low Plank 2 High Plank

1/12/2016

0 Comments

 
Today is very similar to Days 1 & 2, but I want you to do as many Yogi Pushups as possible at a time.  Yogi Pushups are slightly different than other pushups as you keep your elbows tucked into your body.  Because of this, you use your entire body in this exercise, not just your upper body.  When done correctly, your entire core is working, as are your hips and legs.  The majority of the work is left to your chest and arms, but so completely necessary for handstanding!  Not to mention other amazing benefits:
  • Provides strength to arms and wrists.
  • Tones the region near abdomen.
  • Calms the mind by relieving from tension, anxiety and depression.
  • Corrects the overall body posture.
  • Improves the sense of balance.
OPTION #1
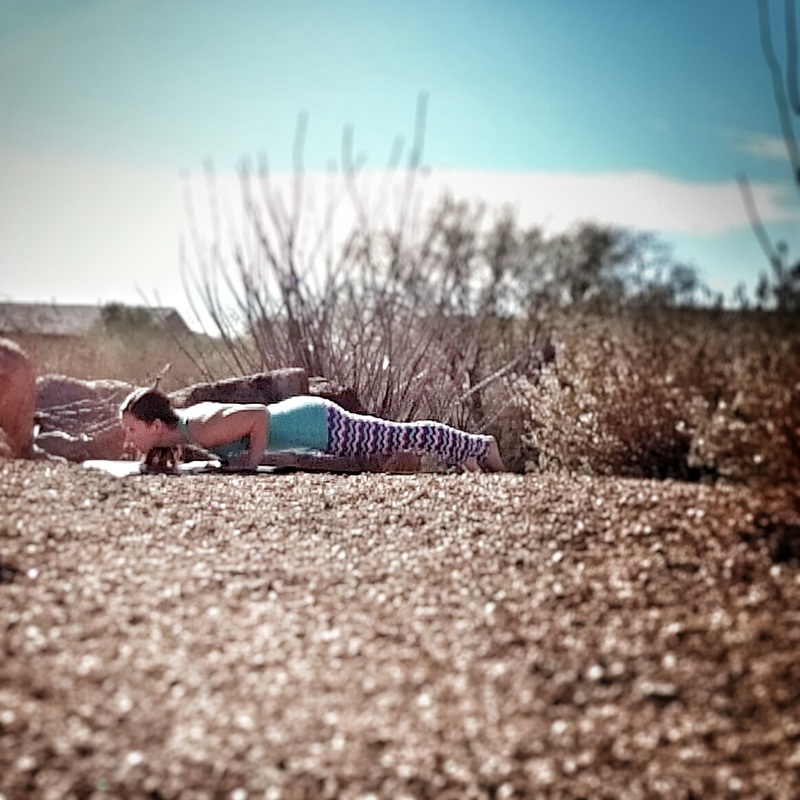
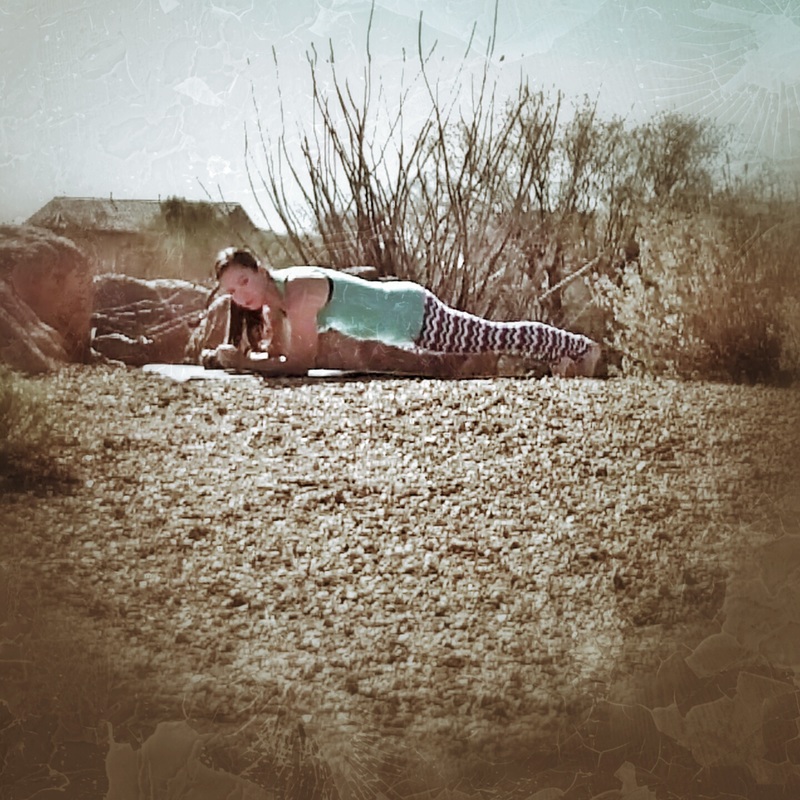
1. Begin in High Plank Pose (see Day 1's directives).
2. Keeping the entire body engaged, roll the body forward to the tiptoes.
3. Hinge at the elbows and begin to bring your body down toward the mat.
4.  Pause for a slow and controlled breath (6 count breath) in this low position.
5.  Real press through the heels of the hands and come back up (without dipping your back).
6.  Come out of the pose to your hands and knees.
7.  Repeat as many times as you can in one sitting.  

OPTION #2
1. Begin in Plank Pose (see Day 1's directives).
2. Lower down onto your forearms, keeping the plank position - belly button pulled up toward your spine, shoulder blades drawn together across your back, back straight and gaze forward.
3. Hands can be pressing into the ground or balled into fists, make sure your elbows are directly beneath your shoulders.
4.  Pause for a slow and controlled breath (6 count breath) in this low position.
5.  One hand at a time, keeping the plank position, slowly come back onto your hand in high plank position
6.  Come out of the pose to your hands and knees.
7.  Repeat as many times as you can in one sitting.

As always, take time to do this exercise three times today. Breathe into your holds. I love to see your photos and to hear how it goes!
0 Comments

VideoLoad moreInstagramSearchLog outAbout usSupportBlogPressAPIJobsPrivacyTermsLanguage© 2016 Instagram Nextlivingrawbygracecrashmom6 and aasifp_stopdropyoga like this1hlivingrawbygrace#Journey2Handstand - Day

1/11/2016

0 Comments

 
If you hadn't noticed, I didn't post anything for Day 10.  This is because while daily practice is necessary to see progress on your journey towards handstands (and your journey in general), a day of rest is important. So hopefully yesterday you all got to rest and relax and rejuvinate and are fresh and ready for today. The last pose and today's pose both tackle Bridge Pose, which has some amazing benefits:
  • Strengthens back, glutes, legs and ankles
  • Opens chest, heart and hip flexors
  • Stretches the chest, neck, shoulders and spine
  • Calms the body, alleviates stress and mild depression
  • Stimulates organs of the abdomen, lungs and thyroid
  • Rejuvenates tired legs
  • Improves digestion
Picture
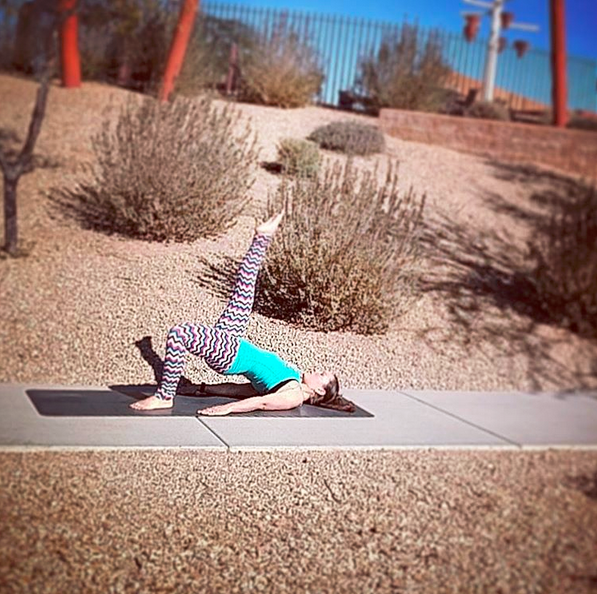
BRIDGE LEGS
1. Begin in Bridge Pose - see day 9.

2. While pressing up into bridge, inhale and with your exhale slowly lift your left leg high into the air, keeping it straight. Press through the heel of your right foot into your mat.
3. Hold here and breathe deeply. Shaking and trembling are wonderful!
4. Slowly lower your left foot back to the mat.
5. You may bring your hips back down to the mat and relax and breathe.
6. Press back into bridge and lift the other leg. (You can stay in bridge and then do the other leg if you don't feel you need to rest). TIPS: Pull your shoulders away from your ears before you press up into breathe and then actively draw your shoulders blades together across your back while in bridge pose. Your leg doesn't need to get as high as mine, find your own version of Bridge Legs that work for you. ☺

This is also a great resource with lots of good tips if you would like to continue reading. 💙

0 Comments

#Journey2Handstand - Day 9 - Bridge Pose

1/9/2016

1 Comment

 
Picture


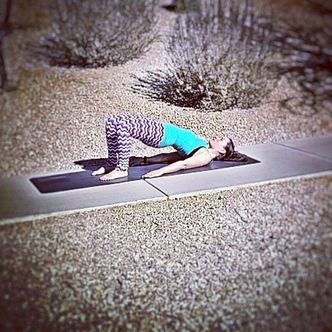
​Bridge Pose is commonly used to stretch and strengthen the back and abdominal muscles as well as open the lungs and chest. Yoga poses that focus on the lower back such as the Bridge Pose have been shown to alleviate back pain. The more you practice Bridge Pose, the stronger your back and abdominal muscles, which similar to the last few days, we are training to maintain balance while inverted in a handstand. 

1.  Begin by lying on your back. Bend your knees so that the soles of the feet are flat on the floor.
2.  Bring the heels about 3-5 inches from your tailbone and spread your toes wide. Place your hands near your hips with your palms on the mat.
3.  Inhale deeply.  With your exhale, lift your hips toward the sky, pressing your heels into the mat.
4.  Continue pressing your hips high for 3-4 breaths, then gently release your hips down to the mat, rolling down one vertebrae at a time.
5.  Come out of the pose by drawing your knees into your chest for 1-2 breaths to counter stretch your back.

TIPS:  Really press in with the hands and the soles of the feet, as they are your foundation.  Imagine a block between your thighs that you are holding there - squeeze your inner thigh together while you are pressing your hips high into the air.  Pull your shoulder blades down away from your ears - you can even clasp your hands together and pull them away from your ears while your hips are high. 

MODIFICATION: Place a block under your tailbone and rest onto it. 

As always, take time to do this pose three times today. Breathe into your holds. I love to see your photos and to hear how it goes!
1 Comment

#Journey2Handstand - Day 8 - Plank Knees

1/8/2016

0 Comments


​Today's yoga is more of an exercise than a pose, and it is not easy.  So, give yourself grace, breathe through it (lots of breath), and tell me how it went! :)  Today we are working on our core! This exercise will help to strengthen your upper and lower abs, your obliques and your muscles across your lower back.  When in handstand, your core keeps you up and will help you balance.  These exercises should become a daily routine on your journey toward your handstand. 
Picture
PLANK KNEES

1.  Begin in High Plank Pose - see day 1 for directives.
2.  Keeping your back flat, your pelvis low without dipping, and your shoulders directly over your hands, slowly lift your left foot off the mat and bring your knee to your left tricep. Take a deep inhale and with your exhale, slowly bring your foot back with your other one. 
3.  Inhale and slowly lift your left foot and bring your knee to your nose. Exhale and slowly bring your foot back.
4.  Inhale and slowly lift your left foot and bring your knee to your RIGHT tricep. Exhale and slowly bring your foot back.
5.  At this point you can take a break, set your knees down, come into Child's Pose, or continue on.
6.  Come into High Plank Pose and go through the whole routine with your right knee.
7.  Come out of the pose into table top and push back into Child's Pose.  Take 5-10 six count breaths.

​Once again, I encourage you to do three sets of these today.  If you can hold your knee at each tricep for more than one breath - even better. If you have NEVER done these before...take your time, give yourself grace, don't feel bad if you need to take more frequent breaks.  It's all a practice...we are working toward slow and steady progress. Once again, let me know that you did these today, whether you were able to take a photo or not. :)  Any questions - shoot them my way on Facebook or Instagram. 
0 Comments

#Journey2Handstand - Day 7 - 3 Legged Dog

1/7/2016

2 Comments


​Let's take our Downward Facing Dogs into new territory! Multiple studies recommend stretching as a natural means to relaxation. Down dog focuses the extension of the cervical spine and neck, releasing compression and stress on the entire spine.  Before you do today's pose, you need to start in Down Dog and if you’re able to shake your head gently yet loosely to the left, right, and up and down during this pose, you’ll be tapping into the anxiety-relieving muscle and mind benefits of the pose.
Picture
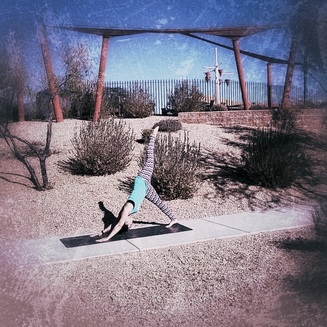
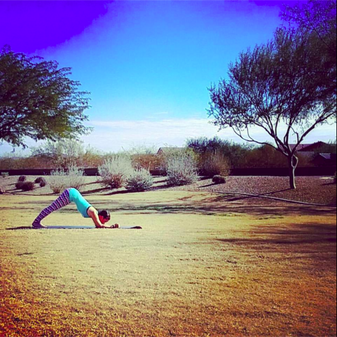
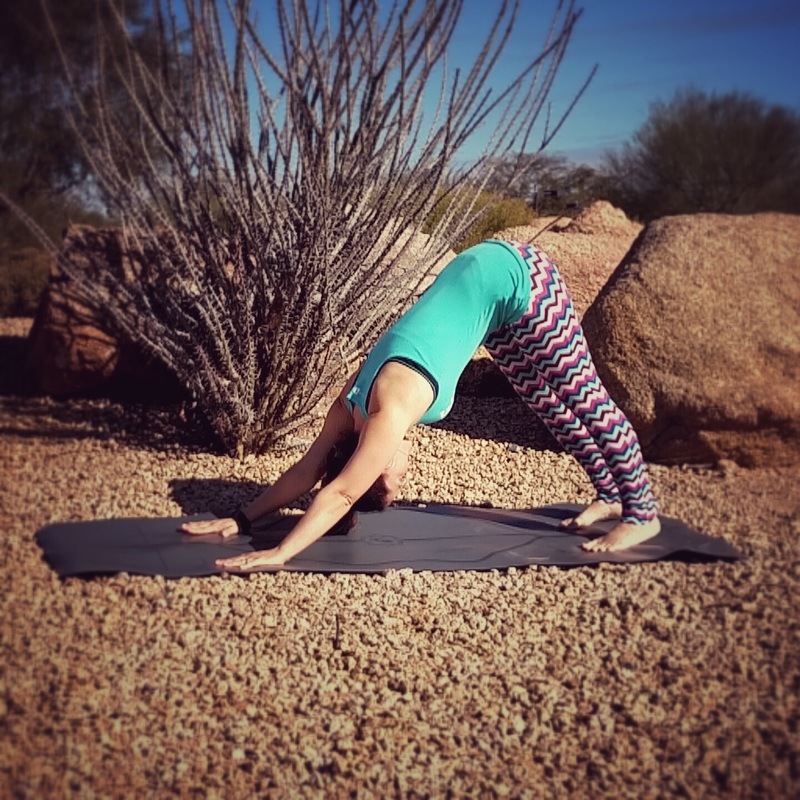
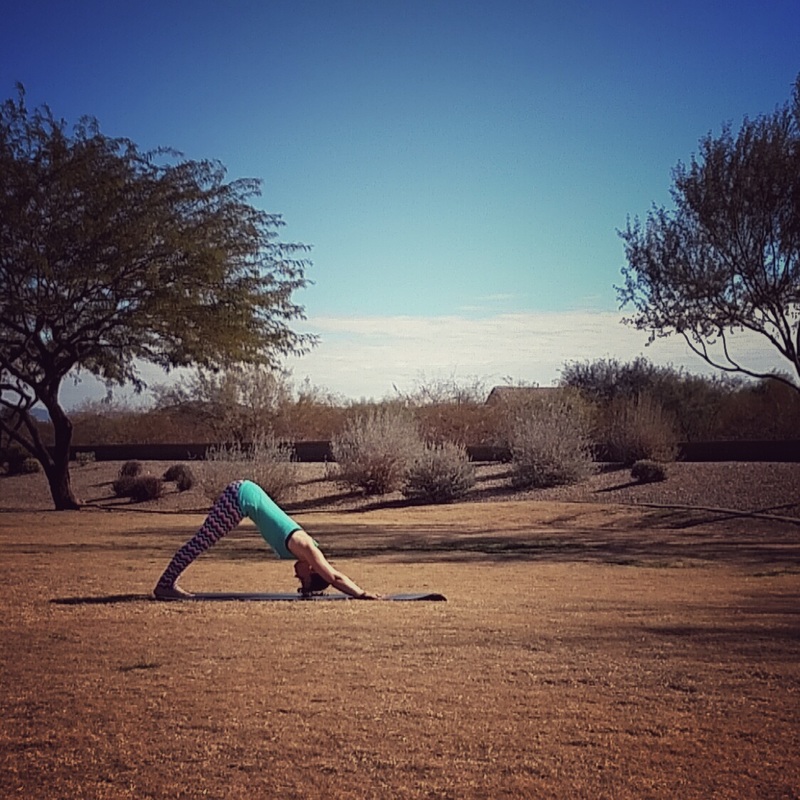
In this pose, one leg is lifted, but there is more to it than that. Let me walk you through it:
​
1. Begin in Downward Facing Dog Pose - see day 3.
2. Keeping your shoulders square and melted toward your thighs, inhale and slowly lift your left leg.
3. As you lift it high into the air, square your hips to the mat - keeping them parallel to the ground.  Be careful not to angle your body to the side.
4. Point your toe into the air to engage your leg muscles, take a 6 count breath in and out, and slowly lower your leg back down.
5. Once more with the other leg. 
6. Slowly come out of the pose into Table Top Pose (hands and knees). 

I will challenge you again to do this pose at least THREE times today - all spread out throughout the day, or all at once as your 10 minute yoga practice. We are building our core, shoulder, back, and arm strength and stability.  We WILL get to handstands...but I want you to be far more capable when we do. I believe in you!

2 Comments

#Journey2Handstand - Day 6 - Side Plank

1/6/2016

2 Comments

 
Plank, Plank, Plank. Today we are working on the Side Plank.  There are MANY variations to this one, but we will begin with a simple scissored feet side plank. We have not done these this month, so take it easy.  If you had a great day of planking yesterday, side planks are a different beast and might be challenging.  We are building up our muscle memory - making ourselves do these poses over and over.  You've got this!  Baby steps!

HERE WE GO:
Picture
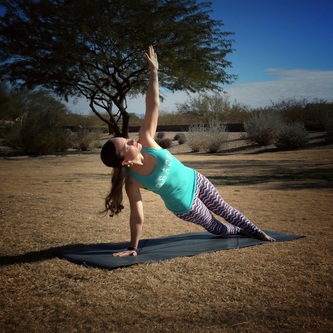
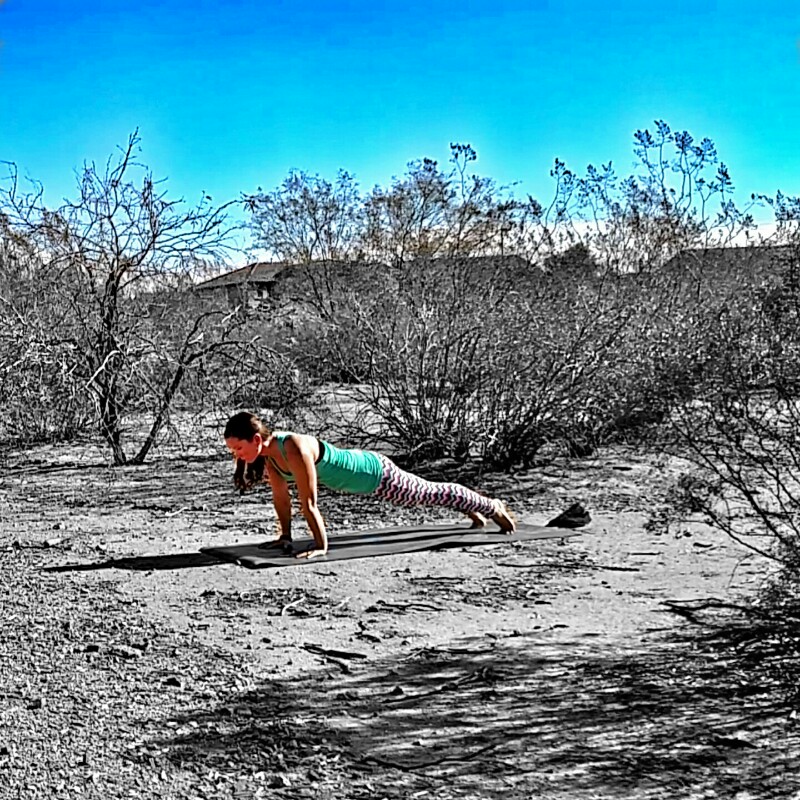
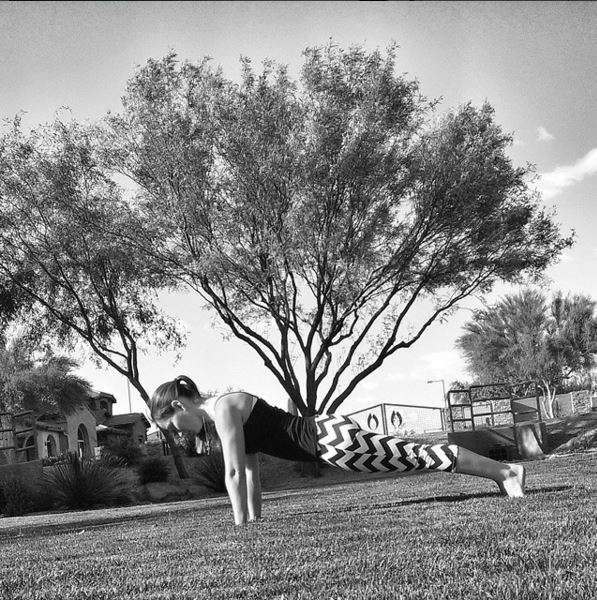
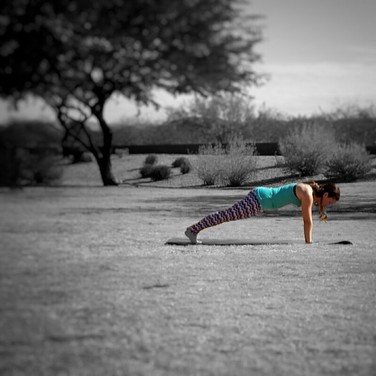
1. Begin in Plank Pose.
2. Bring your right hand directly under your nose.
3. Shift your weight to the outer edge of your right food and bring your left foot in front - scissor your legs.
4. Take your left hand high toward the sky.
5. As you move the right side of the body slightly forward, draw the left side of the body slightly back - stacking the hips and the shoulders.
6. Let your gaze follow and look up at the sky.
7. Stay here and come back to your six count breaths.  Hold as long as you can.
8. Slowly come back to Plank Pose. You can take a break here, or repeat these directives for the opposite side.
2 Comments

#Journey2Handstand - Day 5 - High Plank

1/5/2016

0 Comments

 
AGAIN!?  Yes, again.  Planks are one of the building blocks for handstands.  Shoulder strength, ab strength, arm strength - all necessary to handstand safely and securely. If you cannot hold a plank for very long - handstands aren't for you.  So...we drill.  We practice planks over and over and over. We hold them longer and longer and longer. So today - we hold our high plank longer. We check our form. We breathe into our plank and find rest.  

1. On a yoga mat, or a cushioned surface, come to your hands and knees (known as Tabletop Pose).

2. Be sure that your wrists are directly under your shoulders and your knees are directly under your hips. 
3. Tuck your toes under so that the pads of your toes are on the floor.  Pressing the heels back, roll the weight into the balls of the feet, lift your knees off the foor and come into a high push-up position.
4. Flatten your back and drop your hips low - to do this, melt your heart toward your thumbs so that there is not rounding of your back.  Then draw your navel in and up away from the floor.
5.  Stay here for 3-5 breaths.  Count to 6 as you inhale and again as your exhale - slow and controlled breaths.  Imagine sending oxygen to the areas that are weak, shaky, sore, or tight. 
6.  Close your eyes, release your jaw, and exhale all air out of your lungs.  Then exhale more. Then more. Good, now inhale slowly.

7. Come out of the pose by coming back to Tabletop Pose (hands and knees). 

Time yourself.  See how long you held it.  Then increase by 5 seconds the next time.  And again.  Do as many planks today as you can. Hold each longer than the one before it. This is today's exercise.

Picture
Picture
0 Comments

#Journey2Handstand - Day 4 - Dolphin Pose

1/4/2016

0 Comments

 
If you were able to get into Down Dog yesterday, today's Dolphin Pose should come easily.  Think DownDog on your forearms.  That's it!  All those amazing benefits of Down Dog - all apply to this pose as well.  If you have poor wrist strength, flexibility or stability, this pose can be a great modification for Down Dog.  If you are hoping to work towards a Headstand or a Forearm Stand - this pose is essential at building the strength, flexibility and stability in your shoulders and back.  I encourage all of you to do this pose at least 3 times today.  All three at one time, or spread throughout the day, but don't forget to take a photo and post it on social media!  Tomorrow I'll post a "How to take yoga photos when you are alone" tutorial. 
Picture

Directives for Dolphin Pose
1. Begin in Downward Facing Dog Pose - see yesterday's for instructions. Take a slow, deep, and controlled inhale.
2. While you exhale, slowly lower your forearms down to the ground, one at a time.
3. Melt your chest toward your knees once more.
4. Take 4 six count breaths while here, lifting your hips high into the air.
BONUS for those who read the blog - get an EXTRA entry into the prize drawing by mentioning the blog in your next photo post. ;)
0 Comments

#Journey2Handstand - Day 3 - DownDog

1/3/2016

0 Comments

 
I could go on all day about how wonderful Downward Facing Dog Pose is in Yoga.  Here are just five amazing benefits: 
  1. It builds bone density. Postures like Downward Dog (as well as more difficult arm balances) that place weight on the arms and shoulders are great for building upper body strength and preserving bone density, says Herbert–especially important for women as we age and become more at risk for osteoporosis.
  2. It wakes you up. Herbert cites B.S.K. Iyngar, the 94-year-old founder of Iyngar yoga, who says that Downward Dog is one of the best poses you can do when you’re fatigued. “He recommends at least a minute in the pose,” she says, “to bring back lost energy for runners after a hard race.” It works equally well, she adds, for those of us who are just tired from a long day at the office, too.
  3. It eliminates stiffness and back pain. “I find it’s good for people who get pain in their shoulders and upper back,” says Herbert. “Practicing it with proper alignment can make your upper back more flexible and less likely to store so much tension.”
  4. It boosts circulation. Any pose where the heart is above the head is a good one for the circulatory system, because it encourages blood flow throughout the body. An active circulatory system helps flush toxins from our body, keep our immune system in tip-top shape, and helps regulate blood pressure.
  5. It can be easily modified. If you’re overweight, it can be intimidating, difficult, or even painful to put so much weight on your arms in downward dog. We will talk about Dolphin Pose tomorrow, which is a great modification, 
   
​
Picture

Picture
So let's get into it!
​
1.  Begin in Tabletop Pose (Hands and knees). Take a slow, deep, and controlled inhale.
2.  While you exhale, lift the hips up and back toward the ceiling while pressing into the mat through your palms. Move your weight into your legs without locking your knees. Pull your navel in toward your spine.
3. Drop the crown on the head toward the floor and melt your chest toward your knees.
4. Stay here and come back to your 6 count breaths.
5.  Optional: walk your dog - pedal your feet - one heel up and one heel down - for a few breaths.
  

0 Comments

#Journey2Handstand - Day 2 - Low Plank 

1/2/2016

0 Comments

 
Did you know that doing planks help to improve your mood?  Virtually every exercise has the potential to give you a mood boost, and planks are no exception. Planks are unique, however, in that they help stretch and ultimately relax muscles groups that often become stiff and tense from prolonged sitting. The tension release that planks provide is uplifting for your spirit.   

​There are two options for this one.  You can do a pushup or a forearm plank.  Both are beneficial! 
Option #1:

1. Begin in Plank Pose (see yesterday's directives).
2. Keeping the entire body engaged, roll the body forward to the tiptoes.
3. Hinge at the elbows and begin to bring your body down toward the mat.
4.  Pause for a slow and controlled breath (6 count breath) in this low position.
5.  Real press through the heels of the hands and come back up (without dipping your back).
6.  Repeat 2-3 times, if you can.


Option #2

1. Begin in Plank Pose (see yesterday's directives).
2. Lower down onto your forearms, keeping the plank position.
3. Hands can be pressing into the ground or balled into fists, make sure your elbows are directly beneath your shoulders.
4.  Pause for a slow and controlled breath (6 count breath) in this low position.
5.  One hand at a time, keeping the plank position, slowly come back onto your hand in high plank position
6.  Repeat 2-3 times, if you can.
Picture

Picture

​TIPS:  Keep your eyes focused out in front of you. Keep the body taut as you lower down. Really lift up your navel to prevent a sway in your lower back. If you need a gentler version - drop to your knees as you work through the entire exercise. Even on your knees you are working all the same muscles!
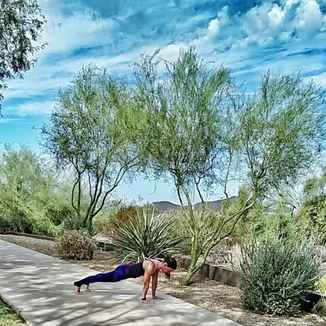
0 Comments

#Journey2Handstand - Welcome to Day 1

1/1/2016

1 Comment

 
Welcome to the #Journey2Handstand Challenge for January 2016! We are going to practice different poses/exercises each day this month to gain strength and stability in order to work towards a strong handstand. This doesn't mean we will all have amazing handstands that we hold for minutes by the end of the month, although someone might. It will mean that your arms, shoulders, back, legs, and core will be stronger by the end of the month and you will have learned the foundation of how to work into a handstand. My name is Haley and I will be with you this month, walking beside you, showing you the path and encouraging your walk. 
Picture

Day 1 - High Plank

Wait Haley, you said we were working on Handstands!  No, I said we were working TOWARD handstands! Let's start with gaining strength. If you’ve never tried one, a plank may look easy, almost too easy to be beneficial, but this is deceiving. While getting into the proper form is straightforward, holding the position takes strength and endurance in your abs, back, and core.
The plank is one of the best exercises for core conditioning and it also works your glutes and hamstrings, supports proper posture, and improves balance.  Sounds perfect for handstands, doesn't it?

Here we go:

1. On a yoga mat, or a cushioned surface, come to your hands and knees (known as Tabletop Pose).
2. Be sure that your wrists are directly under your shoulders and your knees are directly under your hips. 
3. Tuck your toes under so that the pads of your toes are on the floor.  Pressing the heels back, roll the weight into the balls of the feet, lift your knees off the foor and come into a high push-up position.
4. Flatten your back and drop your hips low - to do this, melt your heart toward your thumbs so that there is not rounding of your back.  Then draw your navel in and up away from the floor.
5.  Stay here for 3-5 breaths.  Count to 6 as you inhale and again as your exhale - slow and controlled breaths.  Imagine sending oxygen to the areas that are weak, shaky, sore, or tight. 
6. Come out of the pose by coming back to Tabletop Pose (hands and knees). 
If at anytime you feel pain - come out of the pose. Discomfort is okay - growth is happening!
Picture
Picture

Visit Facebook and/or Instagram to get into the contest!  
Living Raw By Grace will give one lucky participant a
​FREE UnCookBook of their choosing at the end of the month!

Read More about planks
1 Comment
    Picture

     About the Blogger

    Haley is passionate about Raw Food and how God has used it to heal her. She loves to share what she knows with anyone who is curious, and finds herself talking to everyone around her about her lifestyle. 

    God comforts us in all our troubles so that we can comfort others. When they are troubled, we will be able to give them the same comfort God has given us.  For the more we suffer for Christ, the more God will shower us with his comfort through Christ. Even when we are weighed down with troubles, it is for your comfort and salvation! For when we ourselves are comforted, we will certainly comfort you. Then you can patiently endure the same things we suffer. We are confident that as you share in our sufferings, you will also share in the comfort God gives us. (2 Corinthians 3-7)

    This Scripture applies to every area of  life that Haley is passionate about. In order to be grateful, confidant, and assured of anything in your life...it must be tested and proved. That testing is never easy and rarely pleasant...but it IS purposeful. She now can take the comfort that God has given her and share it with you. Amen!

    Archives

    January 2020
    August 2019
    December 2017
    June 2017
    March 2017
    January 2017
    January 2016
    October 2015
    April 2014
    January 2014
    June 2013
    January 2013
    July 2012
    February 2012
    December 2011
    November 2011
    May 2011
    March 2011
    February 2011
    January 2011
    December 2010
    November 2010
    October 2010
    September 2010
    August 2010
    July 2010
    June 2010
    May 2010

    Categories

    All
    31 Days Of Raw
    Apples
    Appliances
    Banana
    Bananas
    Bible Study
    Bill
    Birthday
    Blenders
    Blending
    Blendtec
    Business Cards
    Calcium
    Calendar
    Calories
    Camping
    Challenge
    Chia
    Christian
    Classes
    Cold
    Consultating
    Coupon
    Crackers
    Creations
    Csa
    Daily Food Journal
    Dehydrator
    Desserts
    Detox
    Dinner
    Dip
    Dips
    Dirty Dozen
    Dr. Oz
    Exercise
    Faith
    Farmer Markets
    Farmer\'s Market
    Farmers Market
    Feminine Health
    First
    Flu
    Food Storage
    Free
    Future Plans
    Generosity
    Goals
    Grace
    Green Crisps
    Greens
    Green Smoothie
    Green Smoothies
    Grocery Shopping
    Handstands
    Healthmaster
    Healthy Food
    Help!
    Help!
    Hurom
    Juice Cleanse
    Juicers
    Juicing
    Mainstream
    Medicine
    Newsletter
    Ninja
    Nuts
    Online Classes
    Oprah
    Organic
    Overeating
    Part-time
    Pictures
    Pies
    Prayer
    Price Matching
    Protein
    Public
    Q&A
    Raw Potlucks
    Raw Recipe Night
    Raw Recipe Party
    Recipe
    Restaurants
    Reviews
    Salad
    Secret
    Special
    Stewardship
    Teaching
    Travelling
    Uncookbook
    Vegan
    Video Club
    Virtual Consultation
    Vitamix
    Water
    Website
    Yoga

    RSS Feed

  • Home
  • 7 Day Detox Program
    • Detox Program FAQs
    • Contact Me
    • Testimonials
  • UnCookBooks
    • Lists of Recipes